
There’s something magical about the combination of melted cheese, savory fillings, and a crispy tortilla. The Grilled Cheese Burrito takes the best of two comfort food worlds—grilled cheese and burritos—and fuses them into one irresistible dish. Whether you’re feeding a hungry family or looking for a satisfying meal prep option, this recipe delivers bold flavors and a satisfying crunch in every bite. Let’s dive into how to make this crowd-pleasing masterpiece at home.
Key Ingredients
This recipe is built on layers of flavor. We start with a homemade taco seasoning that elevates both the rice and the ground beef. The rice is cooked with fire-roasted tomatoes for a smoky depth, while the ground beef is seasoned to perfection. A creamy chipotle sauce adds heat and tang, and of course, plenty of melted cheese creates that iconic crispy crust. Each component plays a vital role in creating a balanced, flavorful burrito that’s golden on the outside and bursting with goodness inside.

Ingredients List
Below is the complete list of ingredients organized in an easy-to-read table:
| Category | Ingredients |
|---|---|
| Taco Seasoning | ▢ 1 tsp garlic powder ▢ 1 tsp chili powder ▢ 1 tsp paprika ▢ ½ tsp cumin powder ▢ ½ tsp oregano ▢ ½ tsp salt ▢ ½ tsp pepper |
| Rice | ▢ 1 cup long grain rice ▢ 2 cup water, more if needed ▢ 1 14.5 oz can fire roasted tomatoes, 14.5 oz ▢ 1 tsp prepared taco seasoning, from above |
| Chipotle Crema | ▢ ½ cup sour cream ▢ lime juice ▢ ½ tablespoon honey ▢ 3 tablespoons chipotle peppers in adobo ▢ ¼ cup fresh cilantro |
| Ground Beef | ▢ 1 tsp oil ▢ 1 lb lean ground beef ▢ ⅓ cup red onion, diced ▢ large burrito size flour tortillas, for serving |
Helpful Tools
To make this recipe easier and more efficient, consider using these three essential tools:
1. Small Food Processor – Perfect for blending the chipotle crema into a smooth, creamy sauce.
2. Skillet or Griddle – Ideal for grilling the burritos to achieve that golden, crispy cheese crust.
3. Measuring Spoons and Cups – Ensures accurate seasoning and consistent results every time.
Having the right tools not only speeds up the process but also helps you achieve restaurant-quality results at home.
Pro-Tips
Follow these professional tips to ensure your Grilled Cheese Burrito turns out perfectly every time:
1. Toast the Rice – Before adding water and tomatoes, lightly toast the rinsed rice in the pot for 1–2 minutes. This enhances the nutty flavor and helps the grains stay separate.
2. Season in Stages – Use the taco seasoning in both the rice and the beef, but taste as you go. You can always add more, but you can’t take it away.
3. Don’t Overfill – Keep the filling centered and avoid overloading the tortilla. This prevents bursting during grilling and ensures even crisping.
4. Low and Slow for Cheese – When grilling the burrito, use medium heat and be patient. This allows the cheese to melt and crisp without burning the tortilla.
5. Try a Low-Carb Version – If you’re watching your carbs, this recipe pairs perfectly with a Keto Philly Cheesesteak Roll Up for a cheese-filled meal without the tortilla.
How to Make Grilled Cheese Burrito
Follow these step-by-step instructions to create your own Grilled Cheese Burrito at home:
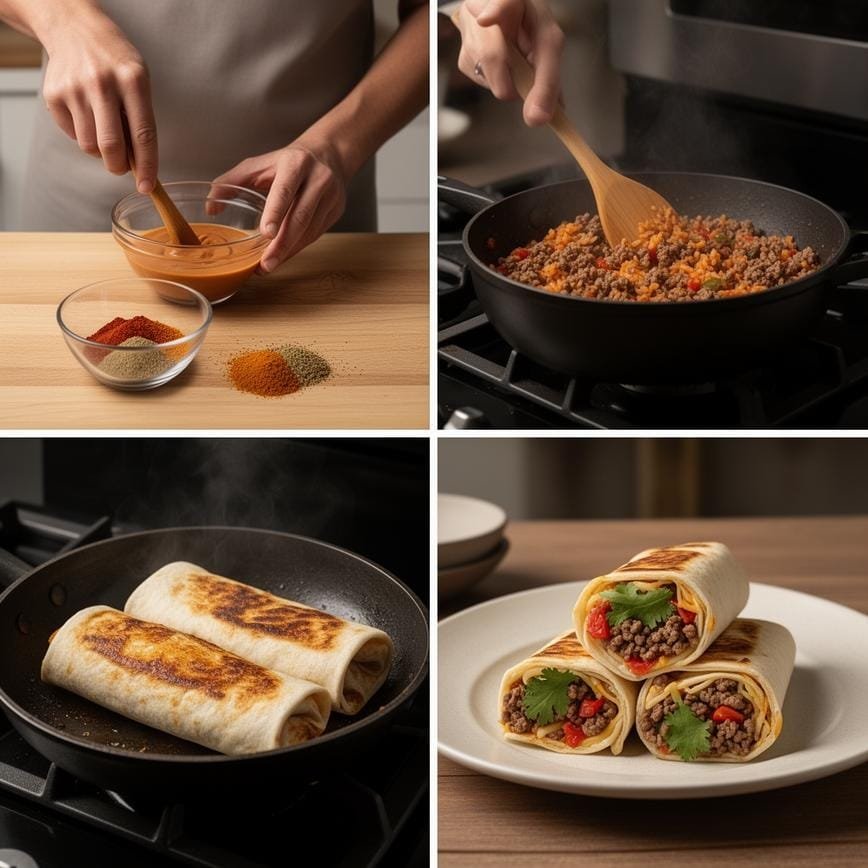
1. Prepare the Taco Seasoning – In a small bowl, mix together garlic powder, chili powder, paprika, cumin, oregano, salt, and pepper. Set aside.
2. Cook the Rice – Rinse 1 cup of long grain rice under cold water. In a pot, combine the rice, 2 cups water, the can of fire-roasted tomatoes, and 1 teaspoon of the taco seasoning. Stir well, bring to a simmer, then reduce heat to low, cover, and cook for 18–20 minutes. Stir occasionally to prevent sticking. Add up to ¼ cup more water if needed.
3. Make the Chipotle Crema – In a small food processor, blend sour cream, lime juice, honey, chipotle peppers, and cilantro until smooth. Taste and adjust seasoning if needed.
4. Cook the Ground Beef – Heat 1 teaspoon of oil in a pan over medium heat. Add diced red onion and cook for 2 minutes. Add 1 pound of lean ground beef and the remaining taco seasoning. Cook until browned and fully cooked through, about 4–5 minutes. Stir in tomato paste if using.
5. Warm the Tortillas – Heat the flour tortillas in the microwave for 20–30 seconds or on a dry skillet until pliable.
6. Assemble the Burritos – Lay a tortilla flat. Add a spoonful of rice, followed by a layer of ground beef. Drizzle with chipotle crema.
7. Roll Tightly – Fold the sides of the tortilla over the filling, then roll from the bottom, tucking in the filling as you go.
8. Grill with Cheese – Heat a skillet over medium heat. Sprinkle about ¼ cup of shredded cheese directly onto the pan. Place the burrito seam-side down on the cheese. Cook for 3–4 minutes until the cheese is golden and crispy. Flip and repeat on the other side.
9. Serve and Enjoy – Cut in half if desired and serve warm with extra chipotle crema on the side for dipping.
Variations
Customize your Grilled Cheese Burrito with these tasty variations:
1. Vegetarian Version – Swap the ground beef for black beans or sautéed mushrooms and add extra veggies like bell peppers and corn.
2. Spicy Kick – Add jalapeños to the filling or mix hot sauce into the chipotle crema for extra heat.
3. Cheese Swap – Try using pepper jack, cheddar, or a Mexican blend for different flavor profiles and melting textures.
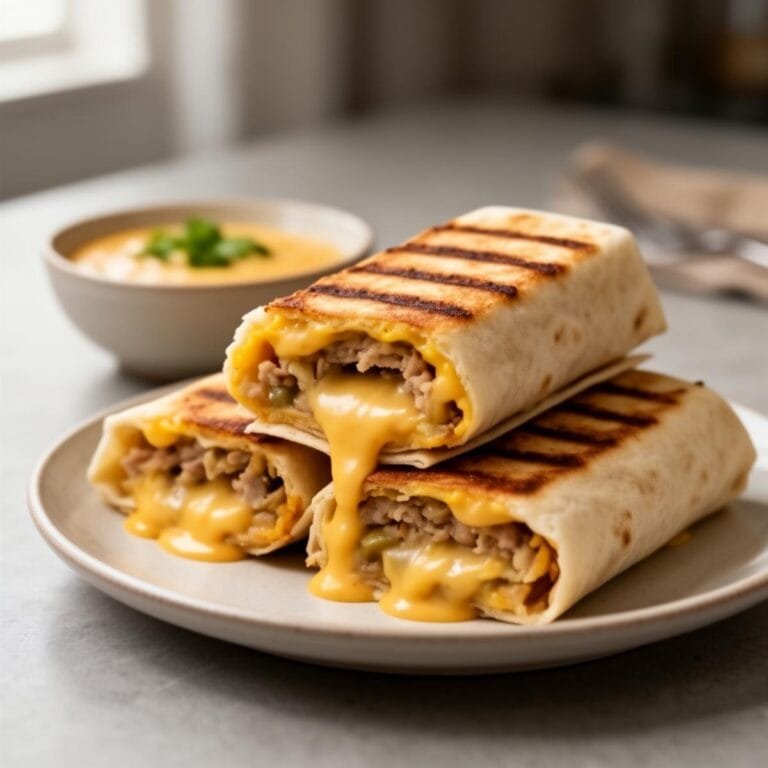
Grilled Cheese Burrito: Easy Mexican Meals
Skip the drive-thru and make this famous Grilled Cheese Burrito at home! Packed with seasoned ground beef, Mexican rice, creamy chipotle sauce, and crunchy tortilla strips, this easy Mexican meal is finished with a crispy, golden cheese crust grilled right onto the tortilla.
- Total Time: 35
- Yield: 4
Ingredients
— The Beef Filling —
1 pound (450g) lean ground beef
1 packet (1 oz) taco seasoning
½ cup water
— The Burrito Components —
4 large burrito-size flour tortillas
2 cups cooked Mexican or Spanish rice (warm)
½ cup warm nacho cheese sauce (store-bought or homemade)
½ cup sour cream
½ cup crunchy red tortilla strips (or crushed Doritos)
2 cups shredded Mexican blend or Cheddar cheese (for the crust)
— Creamy Chipotle Sauce —
½ cup mayonnaise
1 tablespoon chipotle peppers in adobo sauce (finely minced) OR 1 tsp chipotle powder + 1 tsp smoked paprika
1 teaspoon garlic powder
1 teaspoon lime juice
Instructions
1. **Prepare the Beef:** In a large skillet over medium-high heat, brown the ground beef until fully cooked. Drain excess grease. Stir in the taco seasoning and water. Simmer for 3-5 minutes until the liquid reduces and the meat is saucy.
2. **Make the Chipotle Sauce:** In a small bowl, whisk together the mayonnaise, minced chipotle peppers (or powder), garlic powder, and lime juice until smooth. Set aside.
3. **Assemble the Burritos:** Lay out the large tortillas. In the center of each, layer the ingredients in this order: ½ cup cooked rice, ¼ of the seasoned beef, a drizzle of nacho cheese sauce, a drizzle of chipotle sauce, a dollop of sour cream, and a handful of crunchy tortilla strips.
4. **Fold:** Fold the sides of the tortilla in, then roll it up tightly from the bottom to enclose the filling completely.
5. **Grill the Cheese Crust:** Heat a clean non-stick skillet over medium heat. Sprinkle about ¼ cup of shredded cheese directly onto the hot pan in the shape of the burrito.
6. Place the burrito **seam-side down** on top of the melting cheese. Let it cook for 2-3 minutes until the cheese is crispy and fused to the tortilla.
7. Sprinkle another ¼ cup of cheese on the top of the burrito (the side facing up). Carefully flip the burrito over so the new cheese hits the pan. Cook for another 2-3 minutes until golden brown and crispy.
8. Remove from the pan and let cool for 1 minute before serving.
Notes
Rice Shortcut: To save time, use a packet of microwave-ready Spanish/Mexican rice.
Cheese Tip: For the best ‘cheese crust,’ use a non-stick pan. If you don’t have one, brush the pan with a little butter before adding the cheese to prevent sticking.
Spice Level: Control the heat by adjusting the amount of chipotle peppers in the sauce. If you prefer mild, just use a little smoked paprika and lime in the mayo.
Storage: These are best eaten fresh while the crust is crispy. If reheating, use an air fryer or oven to crisp the exterior back up.
- Prep Time: 20
- Cook Time: 15
- Category: Dinner
- Method: Stovetop
- Cuisine: Mexican
FAQ
Q: Can I make Grilled Cheese Burritos ahead of time?
A: Yes! Assemble the burritos, wrap them in foil, and refrigerate for up to 3 days. Reheat in a skillet or air fryer to restore the crispy texture.
Q: Can I freeze Grilled Cheese Burritos?
A: Absolutely. Wrap each burrito tightly in plastic wrap and foil, then freeze for up to 2 months. Reheat in the oven or air fryer—avoid the microwave to keep the crust crispy.
Q: What’s the secret to a crispy cheese crust?
A: Use enough cheese directly on the pan, cook over medium heat, and avoid moving the burrito too much. Let the cheese caramelize slowly for that perfect golden crunch.
Conclusion
The Grilled Cheese Burrito is more than just a meal—it’s a satisfying experience that combines comfort, flavor, and a little culinary creativity. With homemade seasoning, creamy chipotle sauce, and that signature crispy cheese shell, it’s sure to become a favorite in your recipe rotation. Whether you’re making it for weeknight dinner or meal prep, this dish delivers on every level.
For more delicious ideas, follow me on My Pinterest